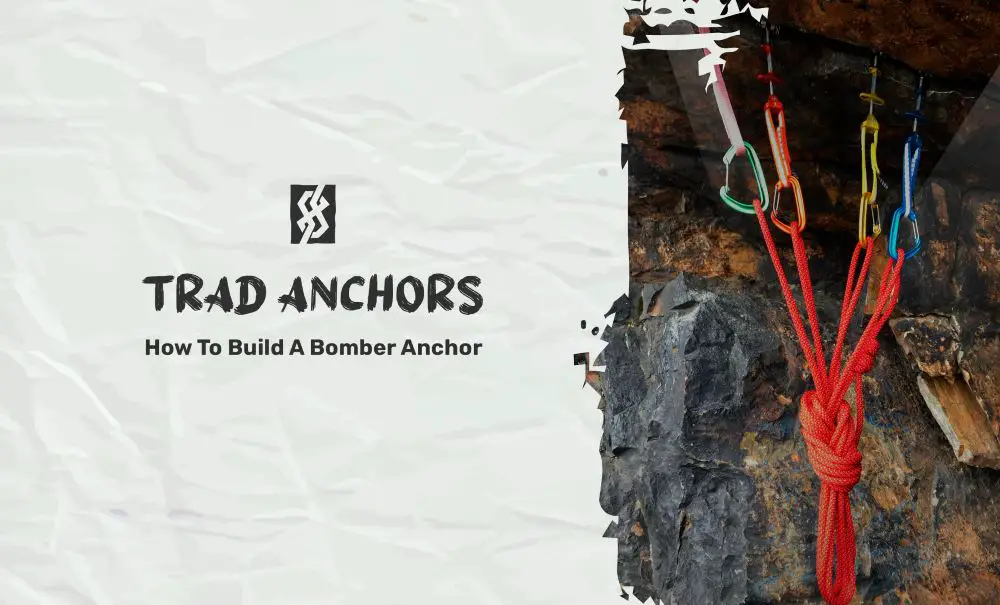
One of the most important systems to master in trad climbing is building anchors. More than any other skill, the ability to build a good anchor is going to carry you through in your trad climbing. But how do you make sure your anchor is sufficient?
Building an anchor is a dynamic process and, just like anything else in the trad climbing world, it is one that climbers – regardless of experience or climbing proficiency – should ALWAYS be re-examining, re-evaluating and striving to improve. In order to make sure that your anchor is as bomber as can be, you need to have a fundamental understanding of the systems involved. This can be a mind-numbing topic, but trust me, you’ll want to pay attention.
S.E.R.E.N.E.
The standard by which a trad anchor can be judged is an acronym called S.E.R.E.N.E. When looking at an anchor, you must ask yourself whether it is…
- Strong
- Equalized
- Redundant
- Efficient
- No Extension
Strong
This is the most straightforward aspect of S.E.R.E.N.E. For an anchor to be strong, each of the points – pieces or natural features – must be well placed, independently solid, and, ideally, each capable of handling the force of a fall on its own. The force that each piece is capable of withstanding – what it will undergo during a fall – is its “active strength,” and is measured in kilonewtons (kN). You can find the strength rating of any piece on the sling, in the case of cams, or the braided cable, in the case of stoppers.
Take a cam, for instance. A #3 Black Diamond Camalot or equivalent is designed to withstand a whopping 14 kN before failing. Generally, it is the nylon or dyneema webbing that will fail before the hardware. When placed effectively, this cam unit should, in theory, be enough to endure the static force of a car!
That being said, in climbing, redundancy is the name of the game. You should never put all of your eggs in one basket (or on any one piece of gear). Let’s define “strong” as any anchor whose components have a combined strength that adds up to 24 kN.

Equalized
To achieve equalization in an anchor, all of the pieces need to be connected at a single point at which any force applied is equally distributed among the pieces. This is especially important in a trad anchor where two pieces of different strength ratings are being used.
Equalizing the various elements of an anchor is a relatively straightforward process. The following example assumes a traditional 3-piece anchor. Using a long runner or a cordallete tied into a loop, the climber clips this loop into the carabiner attachment point of each piece of gear. Taking in hand the sections between each carabiner, they pull them down to meet the bottom of the loop. Using these strands, the climber ties an overhand or figure eight knot. Once tied, there should be a three-strand loop: the masterpoint.
Direction of Pull
An anchor cannot be considered equalized if, when weighted, the system transfers most of the load onto only one of the pieces. To prevent this from happening, the climber must consider where the force of a fall – either their own or their followers – is most likely to come from. Once they have determined the direction of pull, they can use this information to decide the orientation of each piece and where their masterpoint should be tied.
Redundant
In my opinion, redundancy is the most important principle to follow in climbing. A climbing anchor is redundant when you have accounted for all the potential force that could reasonably be applied to your anchor, and then some. For example, as previously stated, an anchor should ideally add up to a 24 kN rating. However, to imagine any more than 24 kN of force being generated by a fall is almost imaginary; nobody can exert that much strain, regardless of how heavy they are or how far they fall.
A 200 lb climber who falls 30 ft (a pretty big fall), when taking into account rope stretch, will only exert 5 – 6 kN of force.
That being said, the principle of redundancy means that we need a safety margin built into our calculations. Hence the rule of 24 (kN).
Efficient
Trad anchors can and should be built in a timely manner. If a climber takes too long to build their anchor, it can lead to time complications, especially on longer multi-pitch routes. To be efficient requires lots of practice, so start by playing around with your anchor setup on the ground, first.
No Extension
This and equalization are two factors of anchor building that are very closely tied together. As previously stated, an anchor is only equalized when the potential force of a fall is distributed evenly among all of the components, generally with a knot.
Now, say one of the pieces of your anchor was to fail. If there is slack in the system, i.e., your masterpoint was not equalized properly, then the other pieces could be suddenly or unexpectedly loaded. This sudden and often severe loading of a piece is called shock loading, and it could lead to the failure of the entire system.
What Can Be Used to Build an Anchor?
There are many different tools that a leader can use in the construction of an anchor. In trad climbing, you must rely on natural features, such as weaknesses (cracks) in the rock to build a belay. However, there are often scenarios where other features can be utilized.
Standard 3-Piece
Very broadly speaking, a 3-piece anchor will usually be strong enough to support you and your partner. Using cams and nuts, you can construct a strong anchor by connecting three pieces with a sling or cordalette. Remember the rule of 24 kN!
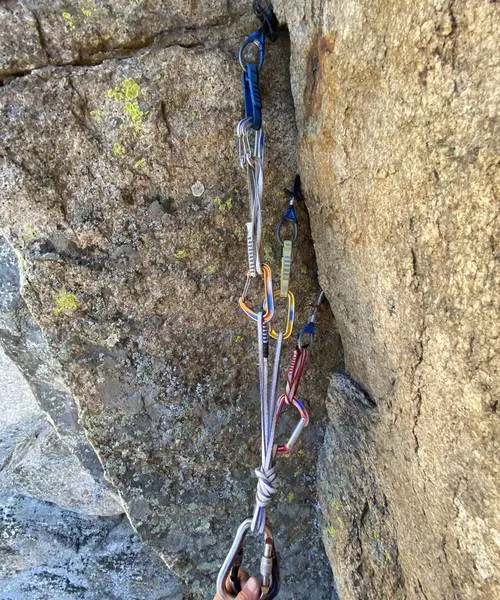
Say, for example, the spot you have chosen for your belay stance only offers smaller gear. In the event that your placements, when combined, do not add up to 24 kN, you may have to add an additional piece to complete the puzzle.
This may require building an anchor “in series,” which means using slings to extend pieces that are spread far apart. It can be easy to compromise equalization here, so be careful! Reference the “in series” image for a better understanding of this tactic.
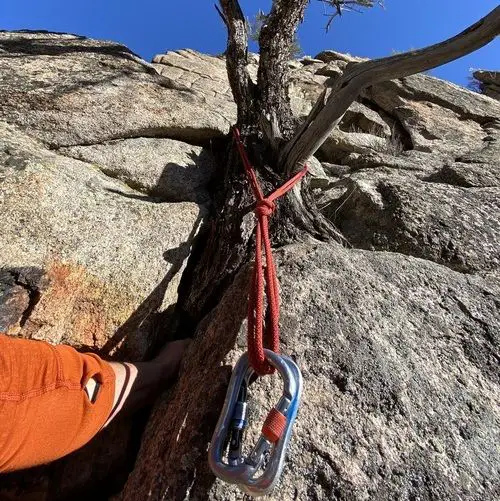
Monolithic Anchors
Oftentimes on route, you will come across large standing boulders on a ledge or, sometimes, even trees! It is important to study up on what size of tree or boulder you can use in creating an anchor.
Boulder
If you have a long piece of cordallete, you can wrap a boulder and belay off nothing but that one point. However, some criteria need to be considered before trusting everything to that one feature.
- Is the boulder removed from an edge or lip which could cause it to slip right off?
- Is the boulder anchored firmly with plenty of surface area in contact with a solid, non-erosive surface? A boulder resting on soil, pebbles or an obvious water course should be considered suspect.
- Is the boulder refrigerator-sized or larger? Anything smaller than a typical refrigerator should NEVER be used.
- Does the boulder have horns, lips, edges, or notches on the underside that can lend security to the rope or cordallete?
There are many more factors to consider. Study up!

Trees
Trees can be and often are used as an anchor point. The golden rule I have used is to ensure the trunk is about the thickness of your thigh. Moreover, are the roots concealed (meaning well-anchored) or exposed? Again, consult a guide or experienced friend before deploying this tactic.
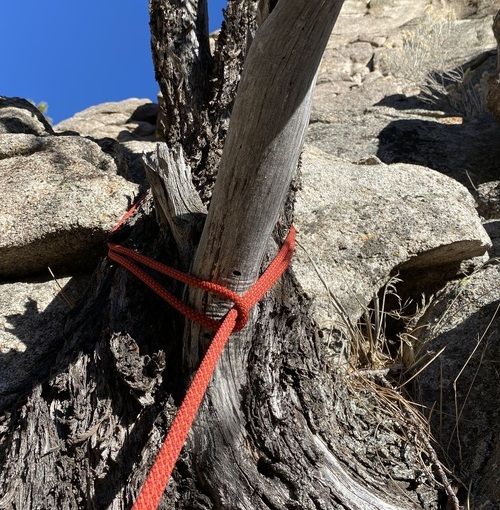
Anchoring Monoliths
When using a boulder or a tree as your sole anchor point, you need to ensure that you are tying it off properly. Using a long sling or cordallete, there are a few options you can use to tie off a boulder or tree, all with varying degrees of strength.
The Overhand
The quickest and most basic way of tying off a large feature as your main anchor point is to wrap it with your sling and tie a overhand using both ends of the loop. The resulting loop will be your masterpoint.
The Girth Hitch
This is sort of “last resort” option. Girth hitching a large natural feature should only be used if there is not enough material to tie a knot. The girth hitch reduces the strength of your cord or sling by approximately 25%. Furthermore, the girth hitch has only one point of failure; if any part of the sling fails, there are no backups to rely on and the anchor will fall apart. It is unwise to take chances; take security steps wherever possible.
The Figure Eight
A step up from the overhand knot, the figure of eight adds one more degree of failure to your knot. When you have the material and the time, always tie a figure eight.
The Bowline
Neither more or less secure than the figure eight or the overhand, the bowline is just another knot one can use to tie off a natural feature while trad climbing.
- Double Bowline – One of the strongest ways to tie a masterpoint. Whenever possible, I like to use this knot.
Ready To Build Your First Trad Anchor?
There are volumes of literature out there which cover every conceivable aspect of anchor building. This is a very rough guide and, while I have included some of the basics, competent anchor building is a critical element of any climber’s skill set. Practice, study, take a course in anchors – you will not be sorry!
Here is a great video explaining the 3 point anchor system:
